Integrating BCome extension in your e-commerce
BCome has created a unique script that works for all kinds of e-commerce platforms, such as Shopify, Woocommerce or Prestashop among others. This guide will help to install BCome UI extension manually so follow the next steps to start!
How to start?
Share and send your e-commerce website URL with your BCome Account Manager. They will use this to configure your account and enable the extension for your e-commerce website domain. Once your domain has been saved on our server, you will be able to start following the next steps in an autonomous and agile way.
How to place the script
There are two options, Autoload or without Autoload (both for manual integrations). BCome recommends always using the Autoload option.
Autoload
Step 01 | Set up the script
- Login in your Shopify account and create a new script in your current theme.
How did I get here? Go to the Online Store in your left sidebar → Access to your Current Theme, click on the Three dots button next to the Customize button → Select Edit code
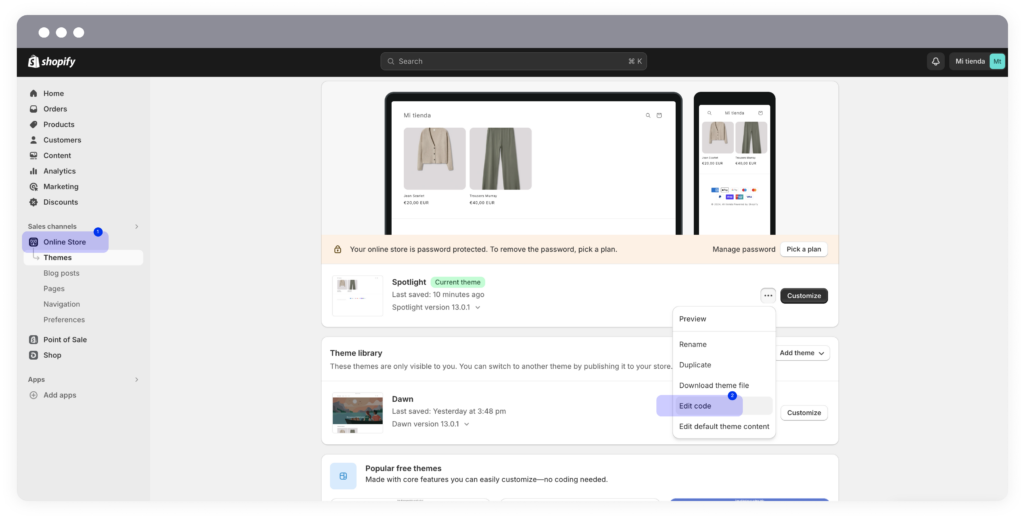
2. We will create a new tag inside the 📁 Layout section → </> theme.liquid, since this block will load in all page and will show the BCome script in all products.
The custom HTML content is:
<script type="text/javascript" async src="https://ecommerce.bcome.biz/index.js?autoload">
</script>
Will be written at the end of the code, before the </body> as shown in the image below ⬇️
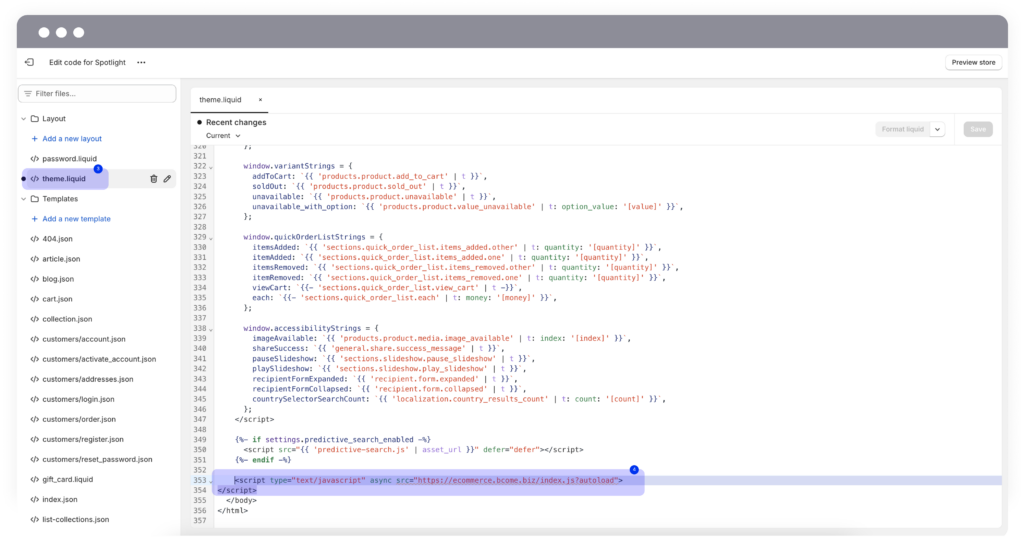
After adding the tag you should submit the new version with this change.
This tag is loaded asynchronously so it will not impact the performance of the page load. If you consider, you can also add the exceptions needed in the tag triggering to limit the loading of the tag only in the product pages, albeit it is not needed. The script is cached in the browser for one hour, and it is delivered via AWS global CDN to boost performance.
📌 Note for advanced Shopify users: Remember that in Shopify you can preview the changes before submit them. This might be useful to test the integration (and the configuration of the next step) before activating it.
Step 02 | Link the extension to the app
Configure where the extension is going to be placed
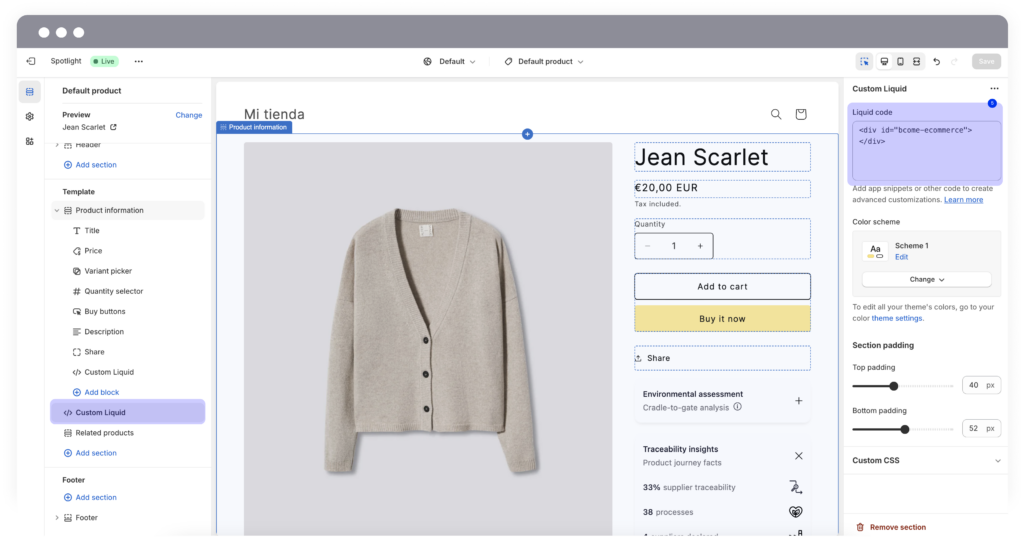
- Customize your template by clicking on the Customize button, from the Online store in the left sidebar.
- ➕ Add a New block → </> Custom Liquid exactly at the position where you want the wiget to be displayed within the Product information template.
- Select the custom liquid and type in the Liquid code selector, the following code:
<div id="bcome-ecommerce"></div>
📍Note: The text between quotation marks will be the name you want to identify the BCome extension. For example, we will use bcome-ecommerce to identify the widget.
Configure the extension in app.www.bcome.biz
💡 Tips: The extension code is going to autodetect the product SKU and EAN scraping the SEO metadata present in your product pages. This works for 90% of the e-commerces.
- To configure the extension go to Digitalization → E-integration and open the Customization tab in your BCome account.
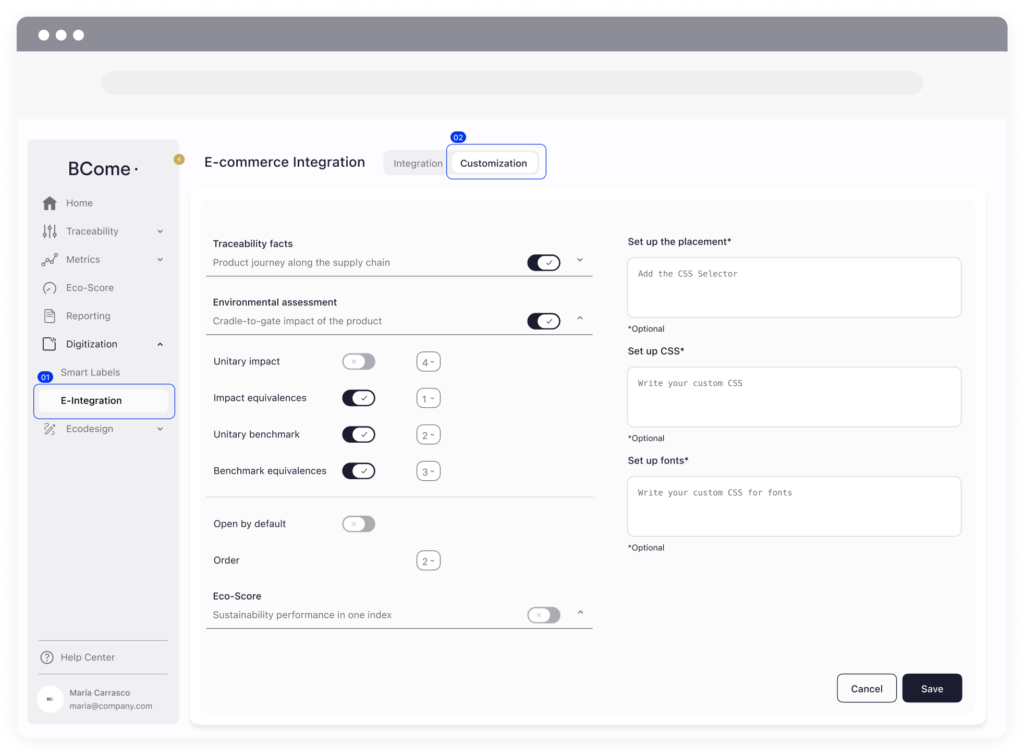
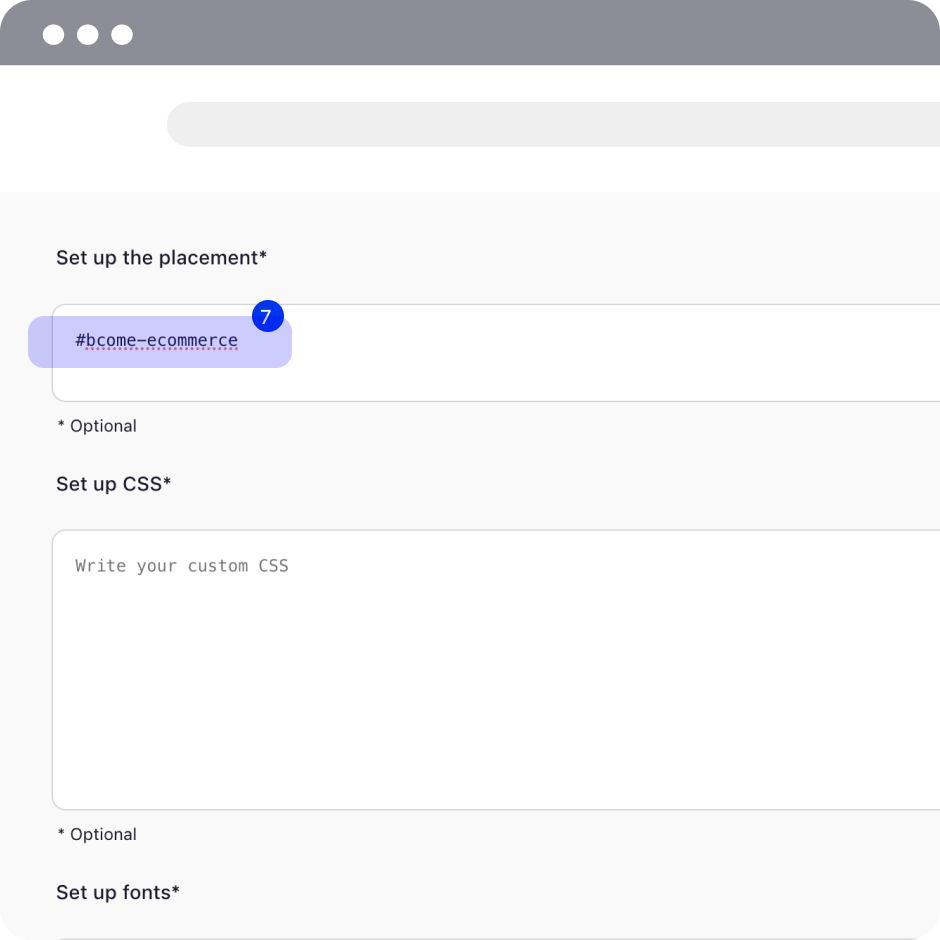
2. Type in Set up the placement section the code with which you want to identify the BCome widget. If previously in Shopify we have identified the extension with #bcome-ecommerce, here we will write the same.
📍 Important: The content within the # will have to be the same as previously written on the Liquid code. If this is not the case, the information will not be linked correctly.
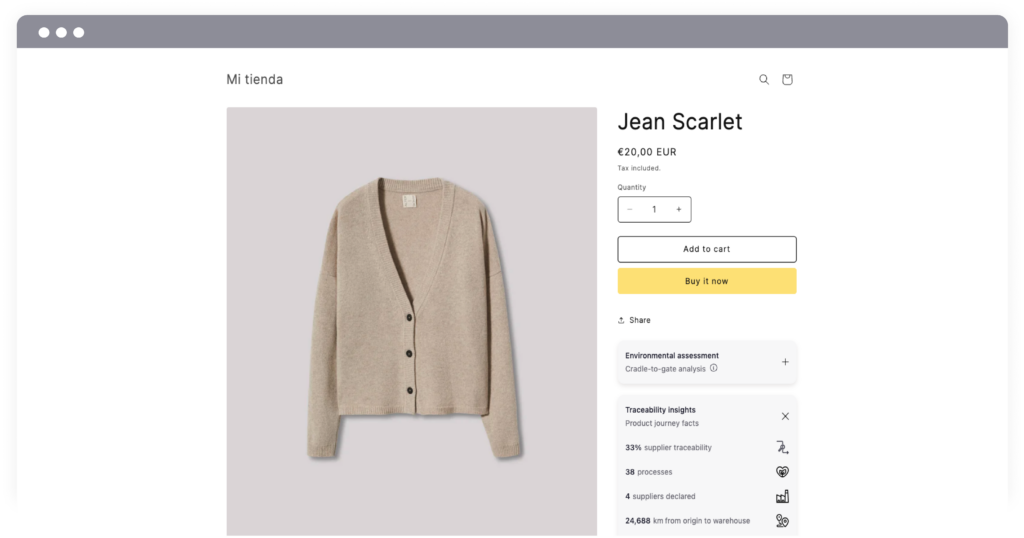
If all the steps have been done correctly, in a few seconds the BCome information will be displayed in the preview.
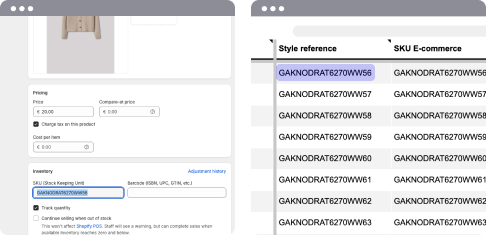
What happens if I have done all these steps and the widget still does not appear? There may be an inconsistency in the declaration of the references. To check that this is correct, access the Products section from the left sidebar → check that the SKUs correspond to those declared in the Traceability excel with BCome Account Manager. Contact her for more information
Step 03 | Configure the modules and the CSS
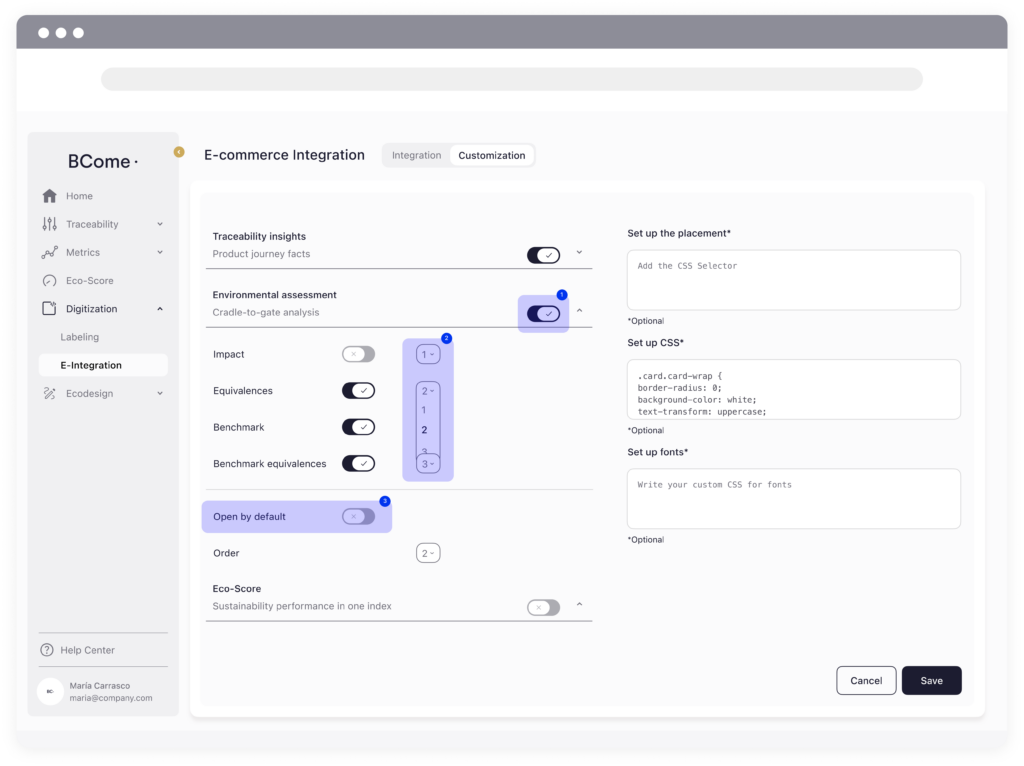
📖 Knowledge: From this panel you can configure your modules that you want to show in your widget. You will only be able to modify those in which your plan is contracted.
- Select through the toggle switch which module to display: the traceability of your products, the environmental part or the ecoscore.
- Only in the Lifecycle Assessment section you can also customize your subsections to choose between equivalences, impact or savings. Sort them through the selector to view them in the order you want.
- Finally, choose whether you want the module to appear automatically open or closed by default. This will help the customer to quickly understand the content inside.
📖 Knowledge: If you are unfamiliar with CSS selectors you should ask for assistance from your technical e-commerce team (anyone with HTML and CSS skills), or learn more here.
Find the CSS selector that corresponds to the section of the product page where you would like the extension UI to be placed. You can do that by inspecting the source code of the page.
🧑🏻🏫 Shortcuts: Discover the two most common CSS issues
- Do you want to eliminate the background color?
To remove the background, we will have to change the color to the color of your web page so that it integrates correctly. In the example, we will see the case that the web is white.
.card.card-wrap {
border-radius: 0;
background-color; white;
box-shadow: none;
}
2. Do you want to change the font color and style?
To change the font color and the style color, we will have to add a style section for the body.
body {
color: #000000;
font-family; SFProText;
}
Without autoload
- Manually in your e-commerce platform
Step 1 | On your e-commerce add the script to each product page (one by one).
Find the HTML template in the footer (end of the body) or the section where your platform allows you to add analytics scripts (such as the Facebook pixel or Google Analytics) and add this HTML snippet:
<script type="text/javascript" async src="https://ecommerce.bcome.biz/index.js">

</script>

<div id="articleRoot"></div>
    <script>
        var bcomeData = {
            ref:  "XXXXXX",
            node: document.getElementById('articleRoot'),
            id: 'XXXXXXXXXXXXXXXXX',
            mode: 'inside'
        };
        if (window.bcomeExtension) {
        window.bcomeExtension(bcomeData.ref, bcomeData.node, bcomeData.id, bcomeData.mode);
        } else {
        window.bcomeData = bcomeData;
        }
    </script>